
via blog.hubspot.com
10 Ways to Add Facebook Functionality to Your Website
By Maya Grinberg
Published December 21, 2011
Integrating Facebook into your website is an easy and free way to include a social dimension with the rest of your website business activity.
Facebook provides a selection of free plugins.
By the time you’re finished reading this article, you’ll understand your options for turning your website into a social hub and how to get started.
Why Facebook on Your Website?
Facebook has a grand vision: to connect the entire Internet, and every website on it, with a layer of social integration. The social network behemoth has been developing tools to assist in the spread of this vision since the introduction of the Open Graph in 2009.
Now, with over 10 social plugins available to the public (and free of charge!), website owners need to decide how best to utilize the available tools for their businesses. The first question you’re probably asking is: Do they even work?
Let’s look at some of the stats from SearchEngineLand:
- The average media site integrated with Facebook has seen a 300% increase in referral traffic.
- Users coming to NHL.com from Facebook spend 85% more time, read 90% more articles and watch 85% more videos than a non-connected user.
- Outdoor sporting goods retailer Giantnerd.com saw a 100% increase in revenue from Facebook within two weeks of adding the Like button.
The research to date has pointed to the fact that Facebook integration helps drive traffic to websites and pages, as users interact with sites and increase the “earned media” of a brand (in other words, the mentions and exposure of branded content that the company didn’t pay for—the authentic word-of-mouth).
To decide which plugins are right for your website, check out the descriptions of each plugin below, along with recommendations for types of sites it is best used with.
#1: Like Button
The Like button lets users share pages from your site back to their Facebook profile with one click. When the user clicks the Like button on your site, a story appears in the user’s friends’ news feed with a link back to your website.

The Facebook Like button is a great way to direct traffic to specific items on your site that otherwise would not have gotten the fanfare.
This is a great way to direct traffic to specific items on your site that otherwise would not have gotten the attention. For example, if you include a Like button on every page and object on your website, you might find that one user who enjoyed a page enough to click Like draws an entirely new audience of his friends to become aware of your brand where they otherwise wouldn’t have seen it.
This approach worked very well for American Eagle, which reportedly added the Like button next to every product on their site and found that Facebook-referred visitors spent an average of 57% more money than visitors who weren’t referred by Facebook.
#2: Send Button
The Send button allows your users to easily send your content to their friends. It’s different from the Like button in that the content sent between friends is communicated via a Facebook message and not, by default, through a public news feed posting as a “Liked” item would be. This button is great for content that might be better served individually.
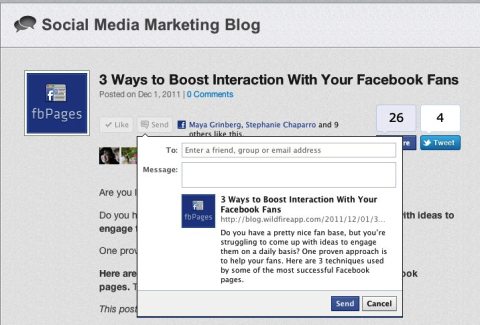
The Send button is great for content that might be better served individually.
For example, if your business is a jewelry store, you should consider a Send button in addition to a Like button, just in case a website visitor is interested in sharing the page of a beautiful engagement ring he just stumbled across on your site with a specific few Facebook friends rather than his entire news feed (and ruin the surprise!).
#3: Comments
The Comments plugin lets users comment on any piece of content on your site. This plugin is especially handy for sites that are not built on top of a content management system (CMS) that already has comment threads built in.
For example, if your website only has product pages and no room for comments, and you’d like visitors to be able to leave comments on each page (or even only on some pages), the Comments plugin allows you this technical capability without having to build an entirely new comments solution for your web domain.
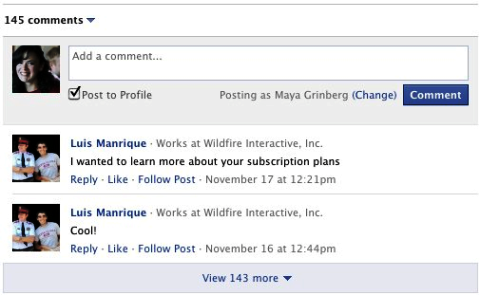
The Facebook Comments plugin is especially handy for sites that are not built on top of a content management system (CMS) that already has comment threads built in.
#4: Activity Feed
The Activity Feed plugin allows you to show users what their friends are doing on your site through Likes and Comments. This is basically a listing of the most recent activity people have undertaken on your website (provided, of course, that these people also happen to be Facebook friends with the visiting user looking at the feed).
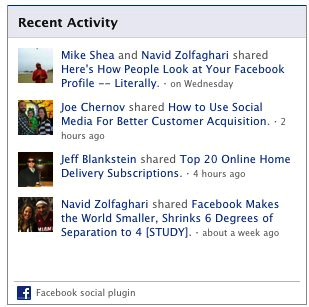
The Activity Feed plugin shows users what their friends are doing on your site through Likes and Comments.
Unless your website is heavily trafficked with a user base that takes many actions (also tracked by Facebook Open Graph tags), there is not a lot of use for this plugin on your page.
#5: Recommendations
The Recommendations plugin lets you give users personalized suggestions for pages on your site they might like. These “personalized” recommendations are compiled automatically by the plugin, using information from the most common activity on your site.
When a user is logged into Facebook and viewing these recommendations, the plugin also takes into greater consideration activity undertaken by that user’s friends (even if the user’s friends made less-popular choices than what regularly occur on the site).
Recommendations is similarly useful to the Activity Feed—if your site is not getting high enough traffic to fill in the plugin’s box with consistently updating recommendations, it can seem like a stale information feed, doing more harm than good.
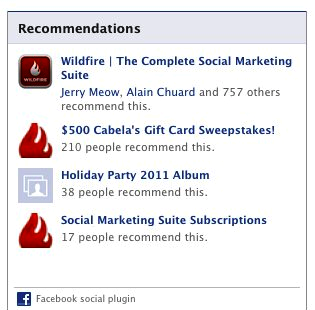
The Facebook Recommendations plugin gives users personalized suggestions for pages on your site they might like.
#6: Like Box
The Like box enables users to Like your Facebookpage and view its stream directly from your website. You can toggle the stream of your Facebook page on or off with this plugin as well, so you have the option of showing a more detailed look into the types of content users can expect to see from your page when they commit to becoming a fan by clicking “Like.”
If your Facebook page messaging stream is consistently updated with interesting content that would be engaging even if taken out of the Facebook environment, keep the stream in the box. If, however, you don’t update your page regularly and the stream is stale, omit it from the Like box settings, as you don’t want to turn off users visiting your website from becoming a fan of your brand based on a seemingly outdated or disengaging stream.
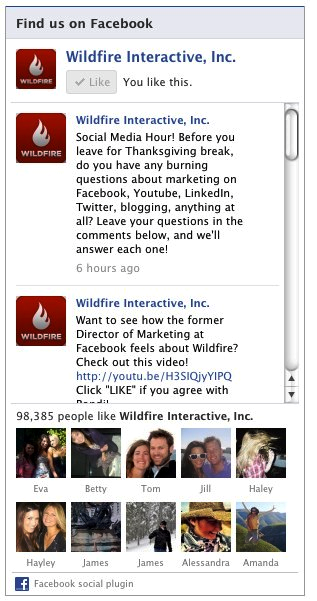
The Facebook "Like" box enables users to Like your Facebook page and view its stream directly from your website.
#7: Login Button
The Login button lets you show profile pictures of the user’s friends who have already signed up for your site in addition to a login button. This is only useful if you’re also going to add in a Registration function (below), which allows you to create a community of website users who are logged into your site (with their Facebook credentials).
When Facebook users login to your site with this plugin, they are also giving permission for your domain to access all the network-available personal information they’ve shared on Facebook, which allows your brand a greater understanding of the kind of users engaging with your website.
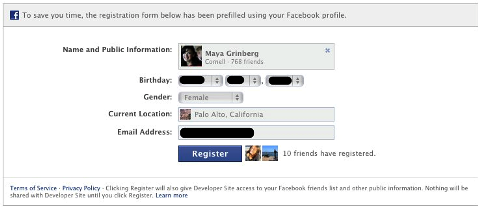
#8: Registration
The Registration plugin allows users to easily sign up for your website with their Facebook account. The registration process is simple for users, and generally includes input fields that are pre-filled with the users’ personal information if they are already logged into Facebook in another tab. This decreases the barrier to entry of signing up and becoming a user (and therefore a member of your community), because the pre-filled form takes one click to submit (whereas a typical account registration form has several blank fields to consider, plus that pesky process of creating a new login and password to remember!).
The Facebook Registration plugin is highly recommended to be included with any websites that require a login to participate, either in place of a traditional registration or in addition to conventional account signup options.
The Facebook Registration plugin is highly recommended to be included with any websites that require a login to participate, either in place of a traditional registration or in addition to conventional account signup options.
#9: Facepile
The Facepile plugin lets you display the Facebook profile pictures of users who have Liked your page or have signed up for your site. However, it only displays the pictures of a user’s friends (that the user is connected to on the network). It’s a visually appealing way to display the pictures of a user’s friends, especially coming in handy to surprise a visiting user when he suddenly sees his friend in an image on your site, realizing that his friend also likes the site.

The Facepile plugin displays the Facebook profile pictures of users who have Liked a page or have signed up for a site, but only if they are friends of the viewer.
If, however, the visiting user has few or even no friends who have Liked the page for your business, there are no pictures displayed. The Facepile plugin is appealing in that it can serve to entice visiting users who recognize a friend’s face in the pile to also click Like.
#10: Live Stream
The Live Stream plugin lets your users share activity and comments in real time as they interact during a live event. This plugin is similar to the Comments social plugin in that a visitor to your website can leave a comment on a page and also post that comment to his or her Facebook profile.
However, with the Live Stream plugin, visitors’ comments don’t remain permanently, and only the last 10 to 15 are displayed, depending on the height set for the plugin.
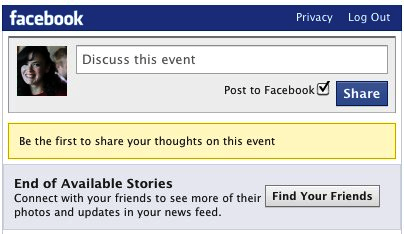
The Facebook Live Stream plugin is handy only if you anticipate hosting live events such as webinars, presentations, video viewings, etc.
Additionally, the moderator of the commentary (that’s you, the administrator of the website) cannot edit or remove comments (something you might want to do if comments are inappropriate). Instead, the administrator can ban users from the live feed.
This plugin is handy only if you anticipate hosting live events such as webinars, presentations, video viewings, etc. It should reside on the same page as the actual event, and need not be distributed on any extra pages.
Now that you know the best use cases for each social plugin, you can choose the integration(s) that are right for your site. When you do this, make sure to consider the amount of monthly traffic your site has been getting (and growing) month over month, to consider if some of the more recommendations-based plugins are right for you.
Note that the installation of each plugin involves technical implementation on the backend of your website (some demand greater technical depth than others), but Facebook has documented these details extensively to help you through the process.
What do you think? What social plugins do you already have on your website? Are you planning on adding any more? Leave us your questions and comments in the box below. We’d love to hear from you!
Tags: activity feed, comments plugin, facebook, facebook marketing, facebook plugin, facebook plugins, facebook social plugin, facepile, like box, like button, live stream, login button, maya grinberg, recommendations plugin, registration plugin, send button, social plugins, website traffic
My simple rule on pricing is to try to figure a rate that makes you happy about doing the project. If the person tries to talk you down from that rate, don't do the project, it's not worth doing. Okay, that requires a little more detailed information so here's the scoop.
First, I try to figure out how long the project would take me and establish an hourly rate for that. In the case of a photography project, you need to make sure you figure time for transportation to the location, setup, the actual taking of the photos as well as the photoshop work and delivery (CDs, Online, Prints, whatever). One of the first mistakes people make is to only account for shooting time, which doesn't take very long at all.
Once you figure out the time, the rate is what will depend on experience. A good rate for a student in our area is between $15–30 per hour. A midlevel professional can make from $35-60, a seasoned pro up to $100/hour or more. This rates are similar for design or photography.
So, let's say that you figure a particular project will take you three hours. One hour for driving time and setup (setup involves looking around the location and planning for the shots), 30 minutes to 1 hour for shooting (remember you'll be doing multiple shots and maybe multiple setups, since when you get to the location, you might see a couple of things you want to try out), and 1 hour for Photoshop. If you charge $20 per hour, then that's $60.
So now comes the part where you figure out if that makes you happy. How does $60 sound? Do you go WOW!!! 60 bucks!! That's cool...or Oh. $60, doesn't seem like a lot of money for all the trouble. If it makes you happy, then your rate is cool, if it doesn't, then your rate was too low and needs to be adjusted. Once you're happy about it and you think it's reasonable enough for them to afford, then you've got your rate. As you get more experienced and more busy, $60 for all that driving, shooting, photoshopping will get less and less exciting. Your rate will be higher when you have more experience and are more in demand.
Make sure you explain what the time is for and what your hourly rate is, preferably in writing. This is important so that they don't take advantage of you and try to keep you there for three hours and expect to receive all of their photos. Say to them. This includes, transportation, setup, photoshop work and 1 hour of shooting, plus delivery (here you could say, I will give you all of the approved photos from the shoot on a CD or I will give you a selection of 5 8x10 prints, or whatever). Approved just means the ones you though were good, since you'll end up deleting the ones where the kids had their eyes closed.
You can say something like this: My basic photo sessions are around $60 (or whatever you end up with). This includes setup, transportation, one hour of shooting and one hour of photoshop. If I end up shooting or there is additional photoshop work to be done, my rate is $20/hour. That makes it really clear that if, when you get there, they want you to take 200 more photos and expect you to photoshop all of them, it's going to cost extra.
If you tell them, it will be $60 and they think it's too much, then you can really explain to them how long this kind of project takes because you've done it. $60 is very reasonable for all the work you'd have to do. So if they complain about it, just tell them no thanks. There's nothing worse than doing a project and working really hard knowing that it's really not worth the time you're putting into it. It's better to work for clients that know what you're worth.
When you're really busy, your time will be worth a lot more. When I'm insanely busy, the rate that will make me happy actually goes up. It means I'll be loosing a lot of sleep to get the job done. My rate also goes up if I know the work will be something I don't really want to do. That' because the amount of money that will make me happy is higher. It's sort of funny, but sometimes I'll price a job really high because I'm either too busy or I don't want to do it. The great thing is that regardless of what happens I'm going to be happy about it. If I don't get the job I'm happy because I don't have to spend all of that time doing the project and I can sleep and do other stuff. If I do get the project, I'm making so much money, that it's worth loosing a little sleep over.
Knowing how to calculate and talk to people about pricing will also take away the fear of what to say because at least you'll know something to tell them and the process for doing it.
Please enable JavaScript to view the comments powered by Disqus. blog comments powered by Disqus
This guest post is by Neil Patel of KISSmetrics.
If you’re a blogger, do you know how to stay on the right side of the law? Do you know what you need to do to keep the FTC from knocking on your door or to keep from getting a dreaded cease and desist letter?
Fortunately you don’t have to be a lawyer or law scholar to understand the laws that govern blogging, particularly in the U.S. In fact, you really only have to understand six basic laws. Let me explain…
note: I’m not a lawyer, so do consult one if you are unsure about any blogging-related laws.
Law #1: Do you have to disclose paid endorsements?
One of the most important developments in the blogosphere when it comes to U.S. law is that bloggers must be open with the fact that they are being paid to use, promote, or review a product.
This all started back in 2006, when the Federal Trade Commission, recognizing that bloggers were displacing traditional ways of advertising that could open up dishonest business practices and conflicts of interest, issued a letter that recommended all bloggers need to be open and honest with their endorsements and reviews.
How open and honest do you have to be? It’s really pretty straightforward if you think about a few things:
- Label information clearly: Wherever you have content, make it perfectly clear which information is editorial and which is advertising.
- Come clean with affiliate relationships: This could mean labeling links that drive to your Amazon affiliates, or building a page that explains all of your affiliates and relationships (see Chris Brogan’s About page for an example).
- Do not claim to be an objective third-party when you are not: You also should explain your relationship with a company when you are talking about them. For example, “Company B, whom I work for, is about to roll out product X.”
To date not one single blogger has been sued over the issue that I know of. But, nonetheless, here is the FTC’s FAQ on the topic.
Law #2: What should I do when someone steals my content?
If you are creating compelling content, it’s bound that somebody will take it and uses it on their site. Sometimes they do it without knowing that they are breaking the law. They may even give you credit and link to your website.
What should you do? Well, it depends.
If you want to protect your work, you should simply send them an email and let them know that what they are doing is called copyright infringement. If you are dealing with an understanding person, then they’ll probably apologize and take the copy down.
If you’re dealing with somebody who doesn’t care what you think, then you’ll need to weigh the cost of pursuing legal action. Typically it’s a very difficult thing to do and will be very expensive.
You can usually discourage people from taking your content by putting a copyright symbol on the footer of your website so it appears on every page.
So when is your work considered to fall under copyright law? Interestingly enough, according to the U.S. laws, it occurs the moment you publish it. So even if you don’t have a copyright symbol, you are still protected.
What exactly is protected on the Internet? Just about everything, including:
- original copy
- links
- images
- podcasts
- videos
- code (HTML, VRML, and other unique markup language sequences)
Still, should you care if someone steals your content? Some bloggers like Leo Babauta do not. He actually encourages people to take his copy as long as they give him credit for it. He calls it his uncopyrighted policy.
Why would he do something like that? He considers the value of spreading his work through this method to be worth more than protecting and defending his rights.
Law #3: Is deep linking legal?
It may come as a surprise to you that there are some doubts to whether deep linking is even legal.
Deep linking is where you write a blog post and then link to another website in that post. However, you don’t link directly to the homepage: you link to a page buried on the site.
For example, one of the sources I used while researching this topic was from a Canadian lawyer who explored some U.S. court decisions on the topic. That link that I just provided does not go to the lawyer’s home page, but to an interior page.
From the perspective of a blogger, it makes more sense to link directly to the page that you are referring to than it does to link to the home page, and then hope the reader can find the information you are referring to.
What’s interesting is that some people have claimed that deep linking is a form of trespassing. One of the most famous U.S. cases was between Ticketmaster and Ticket.com back in 2000.
Ticketmaster’s argument was two-fold: Ticket.com tried to pass off one of their pages as their own when they didn’t link to the home page but an interior page, making it a copyright infringement.
The other argument was that deep linking bypassed the prescribed path a website owner wants its users to go, amounting to trespassing.
It’s not surprising that Ticketmaster lost on both claims.
No other case on this topic has been brought to the court since so it seems safe to say deep linking is a legal practice.
Furthermore, it’s such an accepted SEO practice that there is no reason you should worry that someone might sue you if you deep link to their site. In fact, most people encourage the practice since it brings exposure to their site.
Law #4: Can I use any image on my blog?
The short answer is “no,” because you do not have permission to use just any image. The concern here is that you might use an image that’s not your own, and inadvertently pass it off on your own.
How should you legally use images? Here are four approaches:
- Link to the owner: One practice is to simply put a link below the picture to the owner of the image. This will not be sufficient in many cases, though.
- Buy royalty-free images: You can also simply buy royalty-free images and not have to worry about copyright.
- Use Creative Common images: Another great source to look for free images is to visit the Creative Commons photos on Flickr. These photos do not have copyright restrictions, but are usually based upon a few Creative Common attributes, like “share,” “modify,” or “non-commercial use.” No matter the attribution type you use, it’s still a polite to link to the original Flickr page. This way, people who visit your site know who owns the image and they can easily find more of their work.
- Ask for permission: Of course if you find an image you like on someone else’s website, you can always ask them for permission to use it.
Law #5: Who owns user-developed content?
When it comes to reviews, comments or copy on message boards, you do not own the content: the original author owns it.
How could that be? The same law that protects the copy on your blog is the same law that protects people who write something on your site.
A great way to deal with this issue is to have very clear terms on how you will manage user-developed content. In your site’s terms of use, you should spell out a few things:
- You are at liberty to do with the comments as you please.
- You will not manipulate them or delete them without having a good reason to.
- You will remove them if someone requests (this is really up to you).
- You will require a minimum amount of information so you can avoid anonymous comments.
- You will delete all comments if and when you expire your blog.
If these terms are stated clearly and openly, you shouldn’t have much of a problem when it comes to the law and user-developed content.
Law #6: How do I have to protect people’s private information?
Privacy on the internet is a huge issue. People are worried that their identities will be stolen, their bank accounts will be drained, and the government will watch their every move if they don’t protect their privacy. Naturally, people want to feel comfortable when they are on your blog.
People online are also worried about spam. For example, they don’t want to share their email address with an email newsletter provider because they’re afraid it will be sold to a handful of marketers.
What is your responsibility when it comes to your user’s information? Of course if you run an ecommerce site, you need to protect their information with secure pages.
But what if you are simply collecting an email address?
A good guideline is to have a clear privacy policy on your website. It could be as simple as “We promise never to rent, sell or share your email address.” Or it could be more elaborate, with an entire page dedicated to it. It just depends on how much information you collect.
Conclusion
As you can see, the law is pretty straightforward when it comes to blogging so if you familiarize yourself with the above situations, you shouldn’t have to worry about getting into trouble.
What other laws do you think are important for bloggers to know about?
PS: as I said, I’m not a lawyer, so do consult one if you are unsure about any blogging-related laws.
Neil Patel is the co-founder of KISSmetrics and blogs at Quick Sprout.
If you want to create a blog on a website, WordPress is one of the best blogging platforms to choose for this purpose. Adding a blog to your website is a great way to bring traffic to your website which can increase readership, subscribers and sales for your business.There’s various methods you can use to add WordPress or any other blog platform to an existing website however this tutorial will only deal with adding a WordPress powered blog to any type of existing website.
Choose Blog Directory
First step is to decide on exactly where you want your blog installed on your existing website. The 2 most common locations would be:
- blog.yourdomain.com – This is called a sub domain
- yourdomain.com/blog - This is called a sub directory
It won’t make any difference which directory you choose to install WordPress in to create your blog. Once you have made a decision on where you want your blog installed, its time to install WordPress.
Here’s more on Sub domains & sub directories from Google’s Matt Cutts.
Installing WordPress in a Directory
- If you chose option 1, then you’ll need to create a sub domain in cPanel and install WordPress to that sub domain.
- If you chose option 2, then you can simply install WordPress in a subdirectory using a one click installation tool which the best WordPress web hosts offer or complete the WordPress installation manually. (Not recommended for beginners)
Setup Blog
Once you have successfully installed WordPress, you can setup your blog tab to your existing website and name it Blog. It is recommended to setup your blog on the same domain as your website. This is better for search engine optimization and helps build your domain authority and ranking for your website as well as your blog.
If you possess little or no experience with WordPress, you may find my free Guide to Getting Started with WordPress helpful.
FileLab Video Editor
Try this easy tool to edit your videos online. Edit, enrich, personalize and share your movies!
Launch Now
- Choose videos, photos, music
- Split, cut, rotate, mix, etc.
- Add effects, overlays, texts
- Save and share
FileLab Audio Editor
Rework your audio files online and get a completely new refined and enhanced with effects output track!
Launch Now
- Select audio tracks
- Cut, split, trim, add, etc.
- Apply effects and filters
- Save in popular formats

Learn to use VirtualBox. Get virtual computers up and running inside your computer, without having to buy any new hardware.
With “Computer Inside Your Computer: How to Use VirtualBox” you’ll learn to master this free virtualization software and get virtual computers working inside your computer.
You’ve heard a lot about Linux and you’d love to try it out, but you don’t know enough to take the plunge and install it alongside Windows – maybe you’re worried you’ll wipe all your files off in the process. Besides, you’d like to have another computer handy so that you can look something up if you get stuck, but you don’t have another computer.
Good thing VirtualBox exists. With it you gain the power to conjure virtual computers out of thin air. They don’t take up space on your desk, yet they work just like a real computer does. They can be conjured up and removed with little more than a few clicks.
Intrigued? Download the latest manual from MakeUseOf.com now. Featuring step-by-step explanations as well as picture tutorials, this manual makes using VirtualBox easy.
This free guide will teach you how to:
- Build and manage virtual machines
- Get Windows XP working in VirtualBox
- Install Windows 7 in a Virtual Machine
- Try out Ubuntu Linux in a VirtualMachine
- Install Guest Additions in VirtualBox
- Access files on your host machine in a Virtual Machine
Enjoy and share!
Avoid missed deadlines and streamline the your client delivery process with the Projects App. Use the project tasks to quickly create timesheets and invoices to bill your clients for the work performed. And Yes, it is FREE. So what are you waiting for?Still not convinced? Checkout below what our users are saying about us.

How would you feel if you possessed a nicely polished resume that projects and elevates your level of professionalism? More confident? More positive? I bet!
Crafting a dynamic resume that is also a great selling tool is more time-consuming than 30 minutes. Yet, with the following quick and easy visual and marketing ‘styleover’ tips, you will begin to distinguish yourself from the job search mob in half an hour! That sounds good. Doesn’t it?
Tip 1: Check spacing and make sure your page margins are set to at least a .07 all around. This will not only ensure your resume is inviting but that it meets universal printing standards (abating printing issues).
Tip 2: Bold your name and enlarge the font to 16 pt. or 18 pt. Also, centering your name is a great way to make immediate impact.
Tip 3: Separate your personal contact information with a bullet or divider, providing great visual appeal and easy email and phone number identification.
Tip 4: Add your target Job Title to introduce your Summary or Profile instead of the more common labels such as “Qualifications Profile or just Summary.” This will help you add a great resume keyword right at the top and will lend to your expert image/ brand.
Tip 5: Edit your Summary or Profile, ensuring sentences end quickly; combine ideas and try to limit this introductory paragraph to five to six lines. This will help create a nice crisp look and you will deliver your marketing message more clearly.
Tip 6: Go through the rest of your resume and remove all orphan words (words left on a line by themselves). This just causes an unorganized look and it really isn’t necessary.
Tip 7: Bold resume sections (Employment, Education, etc.) and enlarge the font size to 14 pt. This will nicely separate the areas of your resume and guide readers through.
Enjoying this article? You could get the best career advice daily by subscribing to us via e-mail.
Tip 8: Group job accountabilities together in a paragraph form, separating from achievements. Keep the number of sentences to no more than six. People lose interest when paragraphs are long-winded. Plus, long sentences and paragraphs makes it easier for your message to become convoluted.
Tip 9: Separate your achievements (how you actually performed and the results you generated) from the job description. Bullet them to no more than five to six bullets; any more than that will look too busy and unwelcoming to the reader.
Tip 10: Ensure you have begun all bulleted sentences with action verbs.
Tip 11: Make sure all your bullets line up and match! Inconsistency screams sloppiness and conveys unprofessionalism.
Tip 12: Eliminate any hobbies or personal information (picture, marital status, age, religious associations). These do not belong on your resume.
Tip 13: Read the entire resume aloud to catch awkward phrases end errors. As you read aloud, analyze if what you have just read is relevant to your new career target, if not–remove it!
Tip 14: Check if you have created a second page that is at least a third full. There is no excuse for a second page with just a few lines on it.
Tip 15: Remove the phrase, References Available Upon Request—this is very antiquated and unnecessary.
Now, get to work! Invest time in preparing a resume that you have polished, in turn, fortifying your professional image.
What are a few of your favorite resume polishing tips you’d share with fellow readers?
About the Author: Rosa Elizabeth Vargas has been helping job hunters for over seven years as owner of Creating Prints Resume Service. She leverages an accomplished 10-year career as a Leader/Senior Manager, and is highly experienced in interviewing, hiring, training, and building strong and competent teams. Rosa is a job search strategist, triple-certified as an (MRW) Master Resume Writer, (NCRW) Nationally Certified, and (ACRW) Academy Certified Resume Writer. Find out more about Rosa at her website, via Twitter.
Echoes of the famous Clash song have undoubtedly resonated at that painful moment of deciding whether to quit a job or not.
Go ahead. It’s okay to occasionally indulge yourself in that fantasy of going out in a blaze of glory like a certain JetBlue flight attendant did last year.
But then, let’s get real.
At some point in our career, most of us find ourselves in such a prickly dilemma. The real trick to navigating a confusing mess of conflicting emotions is to rip lyrics right from this song and apply them to the real-work world.
So, darlin,’ you gotta let me know:
“If you say that you are mine, I’ll be there to the end of time.”
Most employers are about as loyal to you as you are to them. Ultimately, your being their employee is a mutual business decision, and loyalty can go out the window if company finances take a tumble. You need to do periodic gut checks on the fiscal health of your employer. If the vibes aren’t good, follow your intuition.
“It’s always tease, tease, tease.”
You have to decide whether promises of promotions, raises, and incentives as well as growth are going to be delivered on by employers. If you constantly get reassurances, but the company doesn’t deliver the goods, it might be time to put the teasing to the end and call it for what it is: being led down the primrose path. Time to start looking.
“One day it’s fine; the next day, it’s black.”
Ever work in a ‘yo-yo’ environment? One day you feel great about your work, only to crash after being hung out to dry by unsupportive bosses? A healthy work environment means you are excited every single day about going to work, and feel rewarded and recognized for your contributions. Sure, we all have bad days, but when they equal or outnumber the good ones, then you’ve got some tough decisions to make… soon.
“If I go, will there be trouble?”
The toughest part about leaving a current employer, sans alternative employment, is possibly facing extended periods of no income. It’s the risk you take, which is why most career professionals advise that you don’t depart one employer until you’ve lined up something else. Ultimately, it boils down to you deciding whether the trouble of looking for a job is worth the possible reward of a great job (and exit strategy of your current work).
“If I stay, will it be double?”
Weighing in the mental cost and toll that having constant issues or stressors at work is something you cannot ignore. Staying in a job you hate can take years from your life, not to mention impact or initiate health problems. Do you know anyone who has gotten ulcers from their job? I do. Plenty.
“This indecision is bugging me. “
Someone once told me that when we fear change the most (thereby hesitating), is exactly when we most need the change. If you have been on the fence for a long time now, it means that there is something gnawing at you and obviously, the status quo isn’t solving it.
“Who exactly am I supposed to be?”
Are you reaching your career potential in your current position? Rose Tremain penned the famous quote: “Life is not a dress rehearsal” – if you are not connected to your passion and realizing what you COULD be, maybe that means that it is time to move on. You only get one chance in this life!
“Should I cool it or should I blow?”
I once had a hothead of a boss, who, at times, was so irrational that it would almost push ME over the edge… it was so infuriating some of the things that this person did. But cooling it might be a good idea – rather than taking the cue from our previously mentioned JetBlue flight attendant friend. Short-term reactions could impact your long-term employability, so taking a step back to determine whether inter-office clashes are one-time only occurrences, or symptoms of a larger, deeper problem.
If the employer doesn’t want you, then maybe setting yourself free could be the answer to opening the door to new possibilities and a healthier work environment.
About the Author: Dawn Rasmussen, CMP, is the president of Pathfinder Writing and Career Services, where she provides results-oriented résumé, cover letter, and job search coaching services. She is the official “Get the Job” columnist for One+ Magazine distributed to over 26,000 meeting professionals worldwide, and Talentzoo.com, a job resource site for creative and marketing professionals.
Dawn is also a recognized career expert on Careerealism.com – a top 10 world-ranked career advice blog – and a regular contributor to TalentCulture.com’s weekly meeting #tchat on Twitter.
In college, or as a young professional, you have many demands on your time; school, commuting, family and social life, exercise… maybe occasionally some sleep. You may also want to take on some internships, but with your already full schedule you think you don’t have time.
You’re in luck! More companies are finding hiring a virtual workforce more practical – and people looking to work virtually, more common – so more virtual internships are becoming available. In fact, about half the internship opportunities on YouTern right now are virtual. (And we just hired several new virtual interns this week!)
For many people a virtual internship is perfect. They get the same level of experience and school credit, and they work from anywhere – their dorm, Starbucks, home – wherever there’s a reliable internet connection. They have the same high level of responsibility as with an in-person internship.
So, what should you do to make your virtual internship a successful experience?
Here, in no particular order, are five simple tips to make sure you get as much value as possible while working remotely:
Embrace Accountability
A virtual internship is a genuine commitment – by you and your supervisor or mentor. During the interview, find out your supervisor’s expectations for you in your virtual internship. The hours and timelines for instance, are often more flexible than with in-office internships. Find out what the supervisor expects of you as the virtual intern.
Illustrate Integrity
You’ll be working remotely, but the same business etiquette will apply to you as a virtual intern as it would in an office. For instance, your “office” is virtual, but your deadlines are real. Icing on the cake: exceed your supervisor’s expectations. When you commit to completing a project by a certain date – hit the deadline or finish even earlier. And complete your assignments even better and more thoroughly than originally discussed. (Your internship is virtual… but your post-internship recommendations, and the possibility to be hired, are real).
Communicate Constantly
There are no in-person water cooler conversations with a virtual internship. No “Hey” head-nods as you pass in the hallway. Because you don’t meet in person, you need to be deliberate with your communication to let your mentor know you’re doing your job. Your best friends in a virtual internship – all available 24/7 – are Skype, email, IM and texting; each enables you to show your progress and commitment. Right before you shut down for the night – each night – shoot your mentor an email or IM: “It’s 1:00AM, here’s what I’ve accomplished recently…”
Sustain Self-Discipline
We can all BS a parent, professor, or boss in real life. In a virtual internship, where no one is looking over your shoulder, it can be even easier – and the temptation, greater. Do everything you can to avoid making this a habit.
During your virtual internship (just as sure as you might miss a Monday in an in-office internship due to the hang-over “flu”) you’ll have times where spontaneity, fatigue or lack of motivation gets in the way of commitment. If it happens too often – if you fail to engage self-discipline – your virtual internship is doomed.
Envision the End-Game
Just like an in-office internship, quality work during a virtual internship can get you hired. Take full advantage of every possible opportunity to impress a colleague, fellow intern, mentor and management. The quality of your work – supervised or not – represents you “at the office”, and could mean a great recommendation, even a job offer. Consistently work as though you are evolving your virtual internship into an employment opportunity.
Virtual internships can provide an intern candidate with more freedom, quality of life and far greater responsibility. Incorporate these tips into your virtual internship. You’ll gain a tremendous learning experience – while perhaps wearing nothing but your boxers and a smile.
About the Author: A passionate supporter of Gen Y talent, CEO and Founder of YouTern Mark Babbitt is a serial entrepreneur and mentor. Mark has been quoted in the Wall Street Journal, Mashable, Forbes and Under30CEO regarding internships, higher education’s role in preparing emerging talent for the workforce and career development. Recently, Mark was honored to be named to GenJuice’s list of “Top 100 Most Desirable Mentors”. You can contact Mark via email or on Twitter: @YouTernMark.
What do you want?
TweetWritten by Jim Connolly1 Comments - Share your thoughts with a comment!In my experience, many hard working people fail to achieve the success they deserve, not through lack of ability, but through lack of clarity.
You can’t hit a target that you can’t see, unless you are extremely lucky. Luck, of course, is not an effective business strategy. This is why we need to get specific regarding what we want to achieve commercially.
The need for clarity
We need to get clear regarding our end game or exit strategy. We also need to know what our outcomes are along the way, so we can plot the stages from where we are today, to where we want to be.
We need a clear sense of direction, so we can tell whether we are on course or not. A clear sense of direction also helps us avoid mistaking movement for progress.
In short: Determine what your end game is and the outcomes you will need to reach along the way. Then, move forward with the confidence that comes from clarity.
Jim Connolly can help you grow your business and achieve the breakthrough results your hard work deserves. If you are genuinely interested in boosting your revenues and profits, the answer is just a click away. For more information, simply click here!
Sometimes, the difference between a profitable blog and a blog that doesn’t make any money isn’t major. In fact, it can boil down to just a few simple mistakes. Of course, every blog is going to be different, with different goals and meeting different reader needs, so not every tip is right for every person. But in general, here are ten really simple mistakes to fix that could be the difference between financial success and failure:
1) Filling Prime Real Estate with Other People’s Ads
In my high school graphic design class, I learned something that I still carry with me – a person’s eye naturally moves like a giant “S” across a page. That means that you’re prime real estate is at the top right. Online, anything “above the fold” (aka, the space you can see without scrolling) is also good. What do you have filling these spaces? I see a lot of people with ads in this space. Unless the most important thing for you is to get clicks on your ads (like if your main monetization strategy is a PPC program), why are you just giving this real estate away? Fill the top right with ads for your own products or affiliate products. Sales will jump. Or, use it for mailing list sign-ups, which you can use to drive sales in the future.
Another high-value place? The very end of your posts. When people are done reading, give them something valuable to do, like sign up for your mailing list or check out your product.
2) Not Including a Search Option
If there’s no search option on your blog, people can find stuff on Google instead, right? Right…but will you be #1 in the search results? Let’s say that I remember you reviewing a product but can’t easily find the post. I can search on Google, but what might pop up is someone else’s product review or someone else mentioning that you reviewed that product.
Even for your own products, you might not come up first on Google. One of your affiliates with awesome SEO can easily beat you out, simply by optimizing their posts. While this will still sell your products, you’ll have to pay an affiliate fee whereas on your own site, it’s pure profit. Don’t risk it. Just include a search bar on your blog and you don’t have to worry about it.
3) Avoiding Affiliate Links
If you talk about products often, why would you not sign up to be an affiliate? You don’t have to link everything you mention, but Amazon affiliate links can be easily added when you mention something in a post. Share a Sale and Commission Junction are also two great places where you can find product affiliate links – I’ve used both with success, and usually these affiliate programs give a better commission than Amazon. People are taking your recommendations when purchasing a product. Why shouldn’t you earn a bit of a commission.
When someone approaches you to ask for a review, this is definitely something you should ask as well. Most people have affiliate programs for their products, and if you’re doing them the favor of reviewing their product, the least they can do is allow you to earn a commission for anything you sell.
4) Underestimating the Eagerness of Your Readers to Buy
A few months ago, I was reading a blog that I really enjoyed, so I signed up for the blogger’s mailing list. I got several emails per week from this blogger, and while they were all interesting, not a single one tried to sell me anything. So I asked the blogger…why? His response was that he didn’t want to turn off readers with sales. Now, I definitely think that some people overdo it, but your readers are your fans – they want to buy the things you recommend or products from you. It’s silly to never sell, in my opinion.
The blogger took my advice and added in a sales email about once a month (so, one every 10 – 15 emails) and is now making a boatload of money that way. To date, he’s had no one complain and sees no greater unsubscribe numbers than with non-sales emails.
5) Paying Too Much for Hosting
Shop around. Are you getting the best deal? You want to avoid a shoddy hosting plan to save money, but some companies are waaaay overpriced. Ask your connections on Twitter or Facebook. People can recommend some great hosts that might be better AND cheaper than the host you chose at random.
Even look at the hosting plans offered by your company – do you need the plan they sold you or is their a cheaper plan that would serve your needs? Companies love to upsell you, and you might be paying for stuff you don’t use. It takes about ten minutes to check out the hosting plans available and you could save a lot of money every year that way, especially if you have multiple sites.
6) Not Including Clear Contact Information
If I want to purchase an ad on your site, how do I get in touch? If I can’t find your email address or a contact form in about 20 seconds, I’m gone. Make a contact page and put it somewhere very easy to see on your site. Don’t hide it on your about page. Don’t put it half-way down your sidebar in a small font that’s lost between ads and navigation tools. I don’t understand why bloggers don’t make it easy to be contacted…unless, I guess, they don’t want to be contacted? The best blogs, in my opinion, make it idiot-proof, listing contact information in multiple easy-to-see places.
Personally, I like it even more when I see an actual advertising page for potential sponsors to learn more. Creating an advertising page on your site that’s clearly listed in the top navigation bar or footer (the two places advertisers typically check first) will tell them that you’re open to selling ad space, that you’ve actually thought about your prices (so you’re a professional), and that they’re likely to hear back quickly.
7) Being Too Humble About Your Products
Dude. You’re awesome! Your readers won’t be reading your posts or following your tweets or subscribed to your emails if they didn’t like you. Don’t be afraid to tell people about your products.
In fact, your products should be front and center! Not only that, but when you talk about your products, don’t be humble. Talk about the advantages of your product and, although you should be clear and honest if there are people who won’t benefit from the purchase, make sure you sell it. If you’re not comfortable with sales, let your fans speak for you by posting testimonials. I’m always willing to give away a free copy of my book if someone (especially someone known in my industry) is willing to write a testimonial.
8 ) Crazy Long Sales Letters with No Buy Button until the End
Long sales letters drive me nuts. I understand that they work, otherwise people wouldn’t use them. But just because they work in their current long form doesn’t mean they couldn’t be better. Don’t confuse the fact that you’re making sales with success. If you sell 1000 products on launch day, you might be jumping for joy…but what if I told you that you had the potential to make 10,000 sales? Not so exciting anymore, is it?
I’ll be one of those people who hits the back button, in many cases, if you don’t have a “buy” button near the top. I certainly want to read a little about your product, but I’m there for a blurb, not a book report, and other readers probably feel the same way. So keep your long sales letter with the buy button at the end, but put one closer to the top too for those of us who are sold already.
9) Lack of Formats
This one is specifically for those who create informational products, which is a lot of readers. If I could do one thing differently with my last product launch, it would be to offer not just a downloadable PDF file, but also multiple other formats. Some people still like print. Others will jump on board if you offer a kindle version. Heck, some people even want content broken up and sent via email over time.
If your products are expensive, I think it also make sense to offer different payment structures. Give a discount for those who can afford to buy your product outright, but make it possible to pay in small chunks for readers on a budget. You don’t want to offer so many options that things are overwhelming, but a few choices will help get your product in the hands of more readers, and it doesn’t take much effort to offer multiple options.
10) No Affiliate Program for Your Products
If you’re selling stuff, are you offering an affiliate program? If not…why not? You’ll have a virtual sales team that are only paid when they sell something if you set up even a low-payout affiliate program! I have to love beyond love a product to write a review if I’m not getting a commission. Even then, if it’s a busy week, I might not make time for it. If you have a great affiliate program, though, you’ll see a major boost in your sales, and most of those buyers will be people you never would have reached otherwise, so it’s not like you’re losing money by paying affiliates, at least most of the time. The benefits greatly outweigh the disadvantages, and best of all, it only takes a few seconds to set up an affiliate program through a company like E-junkie.
It’s your turn – what changes have you made on your blog that resulted in big jumps in profit?


